The PDE tab screen is used for downloading data from your Symbol unit into Ezi Office. PDE download can be done at any time and be kept in the system until it is ready to be executed. Various reports and functions can be generated from the one download. To display the PDE tab, click the PDE button on the right hand side of the screen.
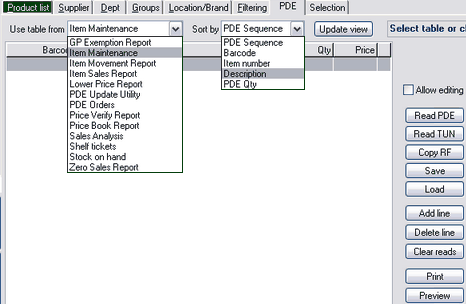
Use table from
Click the drop-down arrow to select where Ezi Office will get the information from. Generally, Item Maintenance contains the most data for generating reports. To view certain information only, make a selection from the available options.
Sort by
Click the drop-down arrow to select how to sort and display the items from the PDE to help you find items easily.
Update view button
Use the Update view button if you make changes to the Sort by option and refresh the list order accordingly.
Allow editing
This option allows the user to make changes to the quantity column and price column. Use Allow editing if you need to edit obvious changes on screen instead of making the changes on the Symbol unit and save time from downloading the data into Ezi Office again.
To begin Allow editing, click the box to place a check mark. To prevent accidental changes and to stop editing, click the box again to remove the check mark.
Read PDE button
Begins the process of PDE download and display the "Import stock take file" screen.
1 |
Click the READ button |
2 |
Ezi Office is now ready for you to download data from your PDE/Symbol unit. |
3 |
Set up the PDE for download as per the PDE instructions. |
4 |
Once the PDE has downloaded click on the Finish button. |
5 |
The list will now have the data you downloaded filled in. |
Read TUN button
Starts the TUN information download from the warehouse. Answer Yes when the prompt window displays on screen to begin download. Please wait, do not press any key while the download is in progress.
Copy RF button
Use the data from your wireless Symbol units which are stored in Ezi Office. This will add RF items into the existing list screen. If you already have a list of items on screen, adding RF data will include these on the bottom of the list.
1 |
Click the Copy RF button to display the RF Data screen (Data Groups tab). |
2 |
Select an RF data file by clicking on it once. |
3 |
Click the View button to check the contents/items in the selected file. This will display the Label Request screen. |
4 |
If this is the correct file, click the Back button to exit the Label Request screen and return to Data Groups tab.
If this is not the correct file, click the Back button to exit the Label Request screen and return to Data Groups tab. Select a new data file and View it's contents. |
5 |
When you have the correct file, click the Select button to use it's data. |
6 |
Ezi Office will ask if you wish to delete the original RF file. Yes - Delete the file, this cannot be retrieved. No - Keep the original file for other uses in future. |
Save button
Save all the items in the list as new PDE/Symbol data for future use.
1 |
Click the Save button |
2 |
Type an appropriate name for this file for easy identification in the future. Ezi Office will save this in the correct path, there is no need to save this file elsewhere. |
3 |
Click Save |
Load button
Use data from previously saved PDE/PDA files. Follow onscreen prompts to load a PDE/PDA file.
1 |
Click the Load button |
2 |
Find the file to load. Ezi Office will locate the file in the correct file path, there is no need to change the search folder. |
3 |
Click Open. |
Add line button
Add a single item to the list by using Browser to locate the product.
1 |
Click the Add line button. This will open the Select APN screen. |
2 |
Click the Search button. This will open the Mini Browser screen. |
3 |
Use APN/ITEM number or search using alphabetical characters in the Desc box. |
4 |
Click the Find button. Ezi Office will display the closest possible match in the list box below. |
5 |
Find and select the item to use by clicking it once, then click the Select button. |
Your added item will now appear at the end of the list.
Delete line button
Remove an item from the list.
1 |
Find and select the item to be deleted by clicking it once. |
2 |
Click the Delete line button. |
3 |
Confirm the delete. |
Clear reads button
Clear the PDE list screen. Confirm the clear operation by clicking Yes or No when prompted.
Print button
Send this list straight to the printer.
Preview button
Preview a report version of the list prior to printing.