The available deal actions that can be triggered when the deal's triggers are met are...
Coupon
Flat Discount
% Discount
Free Product
Fixed Price
Coupon
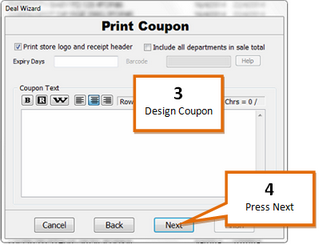
Selecting the coupon action will print a coupon that you create with the receipt of any transaction in which the deal was triggered.
To set up a coupon action...
1 |
Select the Print a coupon option from the Select Action page.
|
2 |
Click on the Next button. |
3 |
Design coupon using available tools.
|
4 |
Click on the Next button. |
5 |
Modify any options you wish for the action.
|
6 |
Click on the Next button |


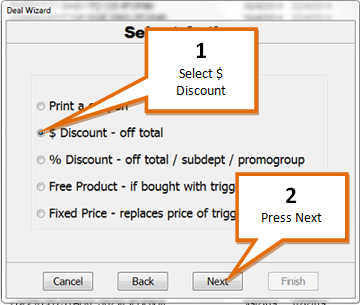
Flat Discount ($ Discount)
Selecting the flat discount action will remove a set dollar value from the cost of the transaction in which the deal is triggered.
To set up a flat discount action...
1 |
Select the $ Discount option from the Select Action page.
|
2 |
Click on the Next button. |
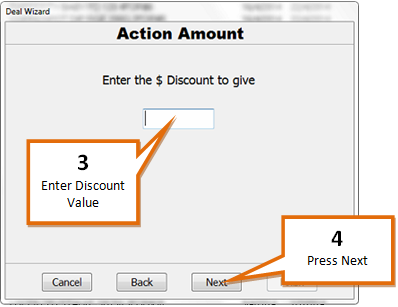
3 |
Enter the value of the discount to be given (e.g. enter 2.00 for a $2.00 discount)
|
4 |
Click on the Next button. |
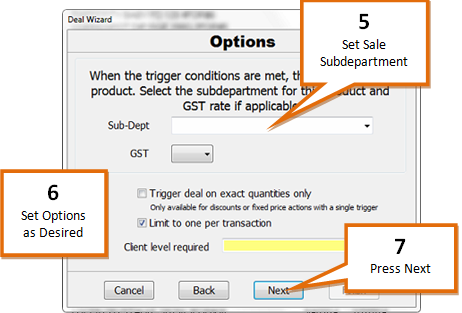
5 |
Select the sub-department that you want the discount to appear under.
|
6 |
Modify any options you wish for the action. |
7 |
Click on the Next button. |
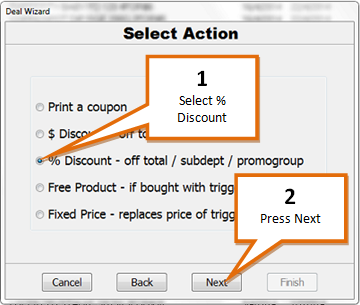
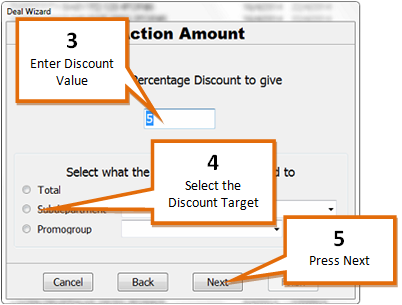
Percentage Discount (% Discount)
Selecting the percentage discount action will remove a percentage from either the total cost, or the cost of products from a specific subdepartment or group, in a transaction in which the deal is triggered.
To set up a percentage discount action...
1 |
Select the % Discount option from the Select Action page.
|
2 |
Click on the Next button. |
3 |
Enter the value of the discount to be given (e.g. enter 20.00 for a 20% discount)
|
4 |
Select either Total, the Sub-department or the promo group you with the discount to be applied to. |
5 |
Click on the Next button. |
6 |
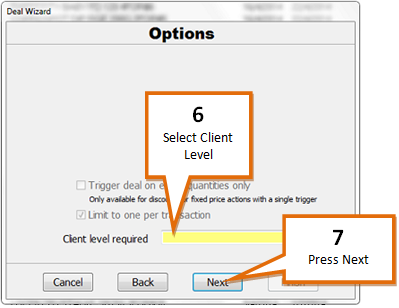
Modify the client level required (if required).
|
7 |
Click on the Next button. |
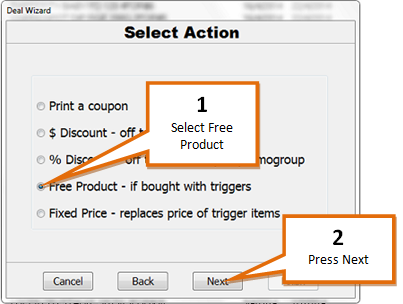
Free Product
Selecting the free product action will reduce the cost of a specific product to 0 if it is scanned in the same transaction in which the deal is triggered.
To set up a free product action...
1 |
Select the Free Product option from the Select Action page.
|
2 |
Click on the Next button. |
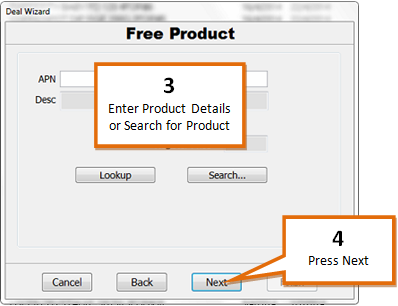
3 |
Enter the PLU of the product to be given away free and press lookup, or use the search function to find the product.
|
4 |
Click on the Next button. |
5 |
Select the sub-department that you would like the free product to be 'sold' under.
|
6 |
Modify any options you wish for the action. |
7 |
Click on the Next button. |

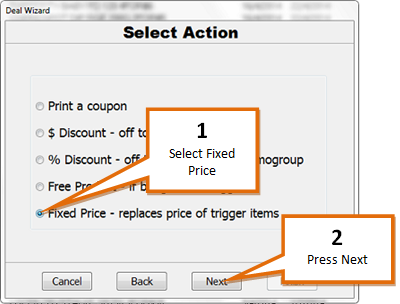
Fixed Price
Selecting the fixed price option will reduce the cost of the deal triggers to a set value in a transaction in which the deal is triggered.
To set up a fixed price action...
1 |
Select the Fixed Price option from the Select Action page.
|
2 |
Click on the Next button. |
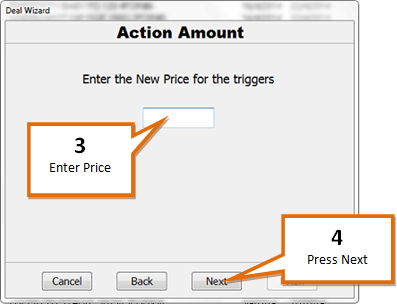
3 |
Enter the new price that the trigger items total sale price will be reduced to (e.g. 20.00 to reduce the total price to $20.00)
|
4 |
Click on the Next button. |
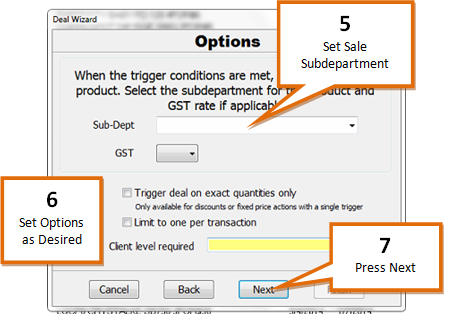
5 |
Select the sub-department that you want the discount to appear under.
|
6 |
Modify any options you wish for the action. |
7 |
Click on the Next button.
|