This report allows you to view a number of items dumped (and individual counts for each item) and total shrinkage value.
![]() Before beginning any report click the Clear All button on the bottom right hand side of the screen. This will return all tabs to the default settings. When all settings are back to default the three buttons on the bottom right hand side of the screen will be green.
Before beginning any report click the Clear All button on the bottom right hand side of the screen. This will return all tabs to the default settings. When all settings are back to default the three buttons on the bottom right hand side of the screen will be green.
1 |
Click the Markdown button under the Sales tab of the toolbar. |
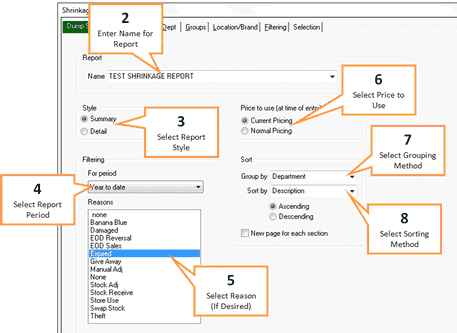
2 |
Enter a name for your report into the Report Name field. Or select a previous report to import by clicking on the drop down arrow and selecting the report.
|
3 |
Select the desired report style using the Style options (either Summary or Detail)
|
4 |
Select period of time that you would like the report on by clicking the drop down arrow next to the Filtering - For Period field, and selecting the desired period.
•Date Tab: This tab displays sales figures for; Year, Month, Week, Days. You can choose to display sales figures using Week ending or Week Starting. To expand or collapse the dates, click the Plus / Minus sign next to the Year, Month, Week or Days. •Period: The Period tab allows you to select from commonly used periods. These include, but are not limited to, Yesterday, Week to Date and Last month. Flag the relevant period by clicking on it when using this tab. •Range: The Range tab allows you to nominate a start and end date for the sales included in the report. Select both a start and end date that encompasses the period of interest when using this tab.
|
5 |
You may select a reason (from the Reasons list) to view dumped stock dumped for particular reasons. To unselect a reason after selecting it hold down the Ctrl key an click it again. To select a second reason without unselecting the first reason hold down the Ctrl key and click the second reason. |
6 |
Select a price to use for calculating loss. This can be either price at time of dumping (Current Pricing), or normal price (Normal Pricing). |
7 |
Select grouping method from the Sorting - Group By field |
8 |
Select sorting method from the Sorting - Sort By field |
9 |
You may wish to further filter down the report using the filter tabs. Any filters selected using the filter tabs will be applied to the report. See Filter options. |
10 |
When you are ready to view your report, click Preview to display the report on screen or click Print to print the report. |
11 |
Click the Save button to save your report settings. |